Building your Own Titanium SDK with Java Script Core
Pre-requisite: You are aware of iOS basics and familiar with iOS app development process.
Q.- How does Appcelerator Titanium Work?
A.- Basically is has modified Java Script Core open source framework and created ticore library,
Which gets added to your build Xcode project when you build your Titanium App for iOS.
So you can use Java Script Core framework directly and create your own SDK, which will work as your want.
Appcelerator has customised this to make a cross platform SDK, because similar JS functionality is provided in android side by V8 JS engine.
So we can use Java Script Core in iOS and V8 in android app development and provide common functionality to create Titanium Like SDK.
Let me show with an example:
Create a Xcode Project, as we create in Xcode. for example say single window application.
My single window Xcode Project:
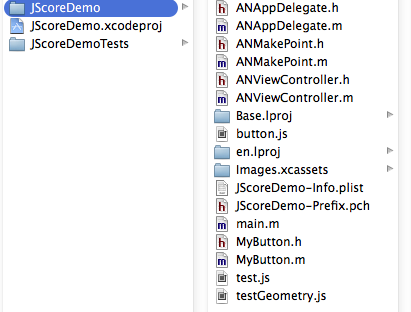
In the above picture, i have added ANMakePoint and MyButton classes along with all the .js files.
Now the open the project in Xcode:

Add Java Script Core framework

Steps:
- After adding the Java Script Core framework, go to your view controller and import the necessary header: "#import
". - After than you need to add one Java Script file, like i did as test.js.
- Write your java script function there and save the file.
- now come to viewController.m and in viewdidload() function, initialise your JS context and evaluate your Java Script code.
- Then you need to get the function form evalauted script using context.
- After that you need to call the JS function from Objc code.
- Sample Code:
NSString *myJSPath = [[NSBundle mainBundle] pathForResource:@"test" ofType:@"js"];
NSString *Script = [NSString stringWithContentsOfFile:myJSPath encoding:NSUTF8StringEncoding error:nil];
JSContext *context = [[JSContext alloc] init];
JSValue *value = [context evaluateScript:Script];
// OBJC-->JS calling example
JSValue *result = [function callWithArguments:@[@5]];
This is very basic example code for Objc to JS calling.
Now Deep diving a little:
What is bonding between JS and Objc:
Actually Java Script Core framework is designed in such a way to take care the differences required by two different languages to execute their code.
For Example Objc is a compiled language and code is compiled before execution, while JS is interpreted language and to run JS with Objc we require a VM(virtual machine) to provided interpreted
environment.
Now This VM and context to execute code is provided by Java Script Core.
Note: VM:- Provide environment.
Context:- is kind of global java script object for your js file. In web world its Window object.
JSValue: is java script object or function or any value on which we work upon.
We can have multiple virtual machine and within one virtual machine we can have multiple context as well.
Image:

We can transfer information (object and value exchange) between two context of same virtual machine.
But we can not transfer information (object and value exchange) between two context of two different virtual machine.
Allowed:

Not Allowed: (No information exchange allowed between two context or different VM).

Part1:
Now Objc to Java Script communication happen with the following sequence:
(calling java script function from objective c)
- We create a Context. (until required one VM is created by default)
- We get our java script code from js file.
- Evaluate java script code. (this will return the value of any self executing function -- java script notation.)
- From context we get our JS value.(any JSfunction or JSObject).
- Call the JS function from Objc using java script core function calling mechanism.
- Get the return value from JS function as JSvalue.
Part2:
Now Java Script to Objc communication: (calling Objc method from Java Script)
- There are two possible way.
- Blocks (Objc block can work as a medium to provide functionality of OBJC code to JS).
- JSExport protocol. (A protocol will work as a class to JS code).
Blocks:
context[@"makeNSColor"] = ^(NSDictionary *rgb){
float red = [rgb[@"red"] floatValue];
float green = [rgb[@"green"] floatValue];
float blue = [rgb[@"blue"] floatValue];
float alpha = 1.0f;
UIColor *colorReturn = [UIColor colorWithRed:red/255.0f green:green/255.0f blue:blue/255.0f alpha:alpha];
return colorReturn;
};
Here makeNSColor will be directly available to java script code as i have added to context(global object).
can be directly called from java script.
var rgb = {
red:255.0,
green:67.0,
blue:70.0
};
var colorVal = makeNSColor(rgb);
JSExport Protocol:
JSExport protocol works just like normal protocol but provide easy access to Objc code from Java Script.
Sample:
#import <UIKit/UIKit.h>
#import <JavaScriptCore/JavaScriptCore.h>
@protocol MyButtonExports <JSExport>
@property (readwrite,nonatomic) NSString* name;
@property double top;
@property double left;
@property double bottom;
@property double right;
-(id)onClick:(JSValue*)handler;
+(double)makeMyPointWithX:(double)x;
@end
@interface MyButton : UIButton <MyButtonExports>
-(void)clickHappened:(id)args;
@end
Using this approach, property values will be used as a java script getter and setter, while instance method will be used with class instance object and class method will be accessed using class object contained within global context object.
Things to take care: Threading and Memory Management is trivial task in this as java script is a garbage collected language and Objc uses ARC.
This information can be found at: https://developer.apple.com/library/mac/documentation/Carbon/Reference/WebKit_JavaScriptCore_Ref/WebKit_JavaScriptCore_Ref.pdf
Apple has also shared one video in WWDC2013 regarding this communication:
(You need to have Safari and developer account.)
My JSCore sample link: https://app.box.com/s/5d7lfqh7l9o8j23pgt57 (Old code, check new code)
(Note: Its quite unstructured yet, but working. Will update soon with a nice well behaved code.)
Online view: https://app.box.com/s/sgbg3xzrj2idtw5svw1g
(New Code Sample)
Updated Code (Much structured and understandable)
Link: https://app.box.com/s/trr1glmd0dfx9y5hoa4a
(New Code Sample)
Updated Code (Much structured and understandable)
Link: https://app.box.com/s/trr1glmd0dfx9y5hoa4a
A working well behaved code is available in github under my github repo.
Link: https://github.com/ashishnigam/Team_Dev_Work
(Code is available now, as promised)
Direct Code Link: https://github.com/ashishnigam/Team_Dev_Work/tree/master/iOS_Native/JScoreDemo
(Code is available now, as promised)
Direct Code Link: https://github.com/ashishnigam/Team_Dev_Work/tree/master/iOS_Native/JScoreDemo
JS functions exposed to java script in my sample.
1: createButton();2: makeNSColor();3: alert("Happy");4: button.onClick(callback) {};is the instance method exposed. used for binding call backs to JS button object.5: var callback = function(args){alert(args);button.tintColor = colorVal;};this the call back exposed which is called on button click.6: Button.createButton({}); is the Class method exposed, used in "testGeometry.js" which can be tested by commenting JSCoreExport feature and thus commenting the "JSCoreFundamental" method call and uncommenting the "JSCoreExports" method call as below viewdidload call in ANViewController.- (void)viewDidLoad{[super viewDidLoad];[self JSCoreFundamental:nil];// [self JSCoreExports:nil];}7: button.removeButton();
Much more functionality is available, best understood with the help of updated code sample. Checkout from github and test on your own system. Let me know for any clarification.In sample i have created colours in JS and button object with its click event binding callback function.
Overloaded JS alert function as titanium sdk did.
Changed the label text colour using JS code with its background colour.
The only thing you may need to do it shuffling of commented and uncommented code in viewdidload().
Feel free to ask any query or any suggestions are most welcome.
This code structure and sample shared is just for conceptual understanding.