Thursday, February 6, 2014

Appcelerator Titanium Module Development for Android

Module Development for Android 

(Using Titanium Version 3.2)


As Appcelerator has already documented well in the android module development part,
So here in this post i am going to write very practical approach which may help you guys for common module initialisation and linking issues.

There are two approaches for module development:

1: Using Terminal and the Eclipse for development and testing.
2: Using Titanium IDE for development, testing and deployment.

Both got their own benefit and drawbacks.

Here i am going to give Module development demo using eclipse, as except module creation in terminal all other things are same.

Terminal Command to create Module:

titanium320.py create --platform=android --type=module --name=<module name> --id=<module.id.reverseDomain> --android=<andorid sdk path>

Explanation:
titanium320.py :  is titanium.py (Titanium SDK version not CLI version) alias in terminal for mac and reference environment variable name in Windows.
name: module name which suits you.
id: module is as per need.
android: Android SDK path. 

Complete Sample command in my machine:
titanium320.py create --platform=android --type=module --name=calc --id=nigam.ashish.calc --android=/Applications/adt_bundle_mac/sdk

This will create a module in the directory you are currently in, in the terminal.

Module Directory structure will look something like this:

The Import the same in Eclipse where after import it should look something like this:


After that just check your build.properties file, it must contain all these properties for proper module build:

titanium.platform=/Users/ashish.nigam/Library/Application Support/Titanium/mobilesdk/osx/3.2.0.GA/android
android.platform=/Applications/adt_bundle_mac/sdk/platforms/android-10
google.apis=/Applications/adt_bundle_mac/sdk/add-ons/addon-google_apis-google-10
android.ndk=/Applications/android_ndk

Now all set, you are ready to build your first module.
Now right click on your build.xml file and go to "Run As" option and click on Ant Build first option.

Result: It will build the module and create module zip in the module source directory, which can be used in titanium application.

Testing on device or emulator:
Right click on your build.xml file and go to "Run As" option and click on Ant Build second option.
it will open a window where on little bit downside scroll, you see a screen like this:
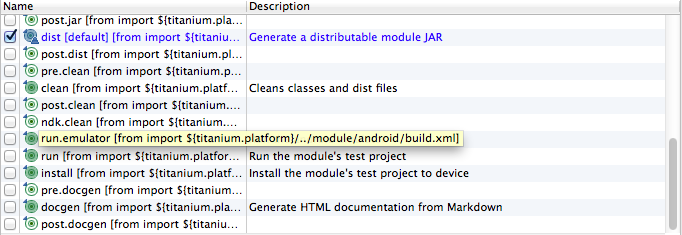

Now you can choose to run on emulator or device:

This will be your screen after selection you can choose both as well but generally not required.

After that hit enter or click ok and it will build your module, create a zip in the module source directory and launch it on device or emulator.

How to use the build zip in Titanium App:

1: Launch Titanium.
2: Go to Help section.
3: Install titanium Module
4: Browse your module zip file path and choose project in which you want to install.
5: Click ok and done, you are ready to use the module in your app.js.

Note: Installing module in SDK Level is not required until module is very generic and will be used in most of the projects.

For Exposing More APIs in your module rather than just simple build, you can now open CalcModule.java file and start adding methods and properties.

Remember to expose methods and properties with proper annotation:

1: @Kroll.module(name="Calc", id="nigam.ashish.calc") //for module class
2: @Kroll.method
3: @Kroll.getProperty
4: @Kroll.setProperty
5: @Kroll.proxy(creatableInModule=CalcModule.class) //for any added proxy class.

There are many more but for exposing methods and properties only these are required.
You can check out lifecycle methods and events for proxy and viewProxy on Appcelerator GitHub Page.

Life cycle methods:

Methods Demo:

View proxy for exposing view:

View or creating custom view:

Passing Parameters to methods:

These are basics about view and proxy which can be seen from github.

Adding 3rd party JARs in module: 

Right Click on your project and click on build path--> configure build path --> and on libraries section add external JAR.

Browse the jar and add it to your project. Import the file in your class and start using them for module development.


Feel free to write your comment on this and any question related to android module development.

Monday, January 14, 2013

Extending Titanium Mobile Application from Native iOS Coding.

Extending Titanium Mobile Application from Native Coding.

This blog is for iOS and Soon Android version will also be here.

Hi all this blog is to explain you something which most of the people looking for months.

1: Create a Titanium Application using titanium and decorate it with your logic as you want.

2: create a build for iOS simulator and that will launch app in iOS Simulator.

3: Close the simulator Go back to your code and put the Titanium Native Extension(com.ti.extnd) module in your code, which is having some limited functionality right now.(grab it from GitHub)
(https://github.com/ashishnigam/Titanium/tree/master/Module%20Work/Extention%20Module).

4:  Use this module from where you want to start Native Coding.

example:

var win = Ti.UI.createWindow({
                    title:title,
                    backgroundColor:'white'
});
var button = Ti.UI.createButton({
                     height:44,
                     width:200,
                     title:"Native Extension Point",
                     top:20
});

win.add(button);

var extndModule = require("com.ti.extnd");  // require Extension module required here

button.addEventListener('click', function() {
                     extndModule.example("ashishClass"); //Provide the Starting point Native Class name
});


5: Go Back to Build phase and build again.

6: Go inside your App build directory and open the build Xcode Project in Xcode.

Here is how it looks like...


In this Pic ashishClass.h and ashishClass.m are Native Class, so first when you open in Xcode it will opened without these two Classes. 

7: now open the menu in your project and add the Native classes.


8: click on "Add Files to "testConcept" and add the Native Classes as per your requirement.

9: Add the following code in your Native Class.. as a starting point for this test module.

+(ashishClass*)sharedInstanceOfMyClass{
    NSLog(@" ashishClass ");
    
    @synchronized(self) {
        if (obj == nil) {
            [[self alloc] init]; // assignment not done here
        }
    }
    //[self alertFunction:nil];
    return nil;
}

- (id) init
{
    self = [super init];
    if(self != nil)
    {
        [self alertFunction:nil];
    }
    return self;
}

-(void)alertFunction:(id)args
{
    UIAlertView *alert = [[UIAlertView alloc] initWithTitle:@"ashish" message:@"Extension done" delegate:nil cancelButtonTitle:@"OK" otherButtonTitles: nil];
    [alert show];
}

after That when you run your project from xcode, you will receive call in Native Class and Its doen to get a starting point here.

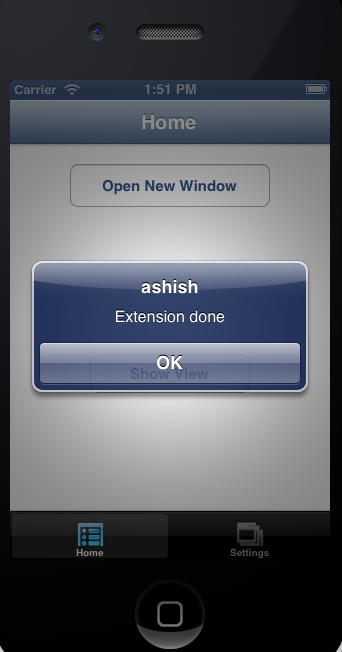
10: See the Images from Titanium UI and functionality.


11: Here Images After adding Native Code.


12: Have a Nice day...  See the Live Video Here.
Drop Box:: 
https://www.dropbox.com/s/ms5qxc3dmvrmr0l/NativeExtention%20-%20Broadband.m4v
You Tube::
http://www.youtube.com/watch?v=ZPKHykWHMdM&feature=youtu.be
GitHub Module:: https://github.com/ashishnigam/Titanium/tree/master/Module%20Work/Extention%20Module


Thursday, July 26, 2012

Appcelerator Titanium Module Development for iOS


Module template Link:: https://docs.google.com/open?id=0B0PuCdyscdjPaTctT0V4LUtCSlE

How to use Module template for Titanium iOS Module Development.
Steps to use:

1: Download zip file from the above link, and unzip it.
2: It will generate a folder named template, and inside that folder there is a file "template.xcodeproj".
3: double click this file to open the project in Xcode.
4: Project contains various file, uses of these are mentioned with file names below.


File Names:
1:ComGlTemplateModuleAssets.h 
2:ComGlTemplateModuleAssets.m
These files are generated files and not meant to be edited.

1:ComGlTemplateModule.h 
2:ComGlTemplateModule.m
This is the module file which is always required for module development and can be single file only.

1:ComGlTemplateSampleProxy.h 
2:ComGlTemplateSampleProxy.m
Its Proxy class, Object of this class can be created in JS files of titanium app and Methods declared in this class can be called using dot notation, if the method signature is according to the Titanium standards. This class is basically created to show case all the LIFE CYCLE Methods of a Proxy Class Object Creation Process, which will be called one by one in a sequence.

1:ComGlTemplateSampleView.h 
2:ComGlTemplateSampleView.m
Its a View class, and It require a view proxy to be associated with it. view proxy can be made available using the naming convention.
So according to the naming convention its view proxy will be ComGlTemplateSampleViewProxy.h and ComGlTemplateSampleViewProxy.m class files.


1:ComGlTemplateSampleViewProxy.h 
2:ComGlTemplateSampleViewProxy.m
Its view proxy for Sample View class and When ever Titanium developer create the instance of the view the This proxy class instance will be created and methods exposed in the proxy will be available to the JS developer.

1:ComGlTemplateSampleDemoProxy.h 
2:ComGlTemplateSampleDemoProxy.m
This DemoProxy class methods are provided to explain certain features like how to fire event and callback methods. This class also explains some of the property change notification methods.

1:ComGlTemplateMethodsandParameterProxy.h 2:ComGlTemplateMethodsandParameterProxy.m
This class explains all the possible values of return type, which can be returned to the JS developer.
It also uses the standards for the methods used by titanium, and it must be followed.

Note: module.xcconfig file is written with some commented code to explain some of the findings and logical relationship between titanium and native platform.
In actual module development these commented things are to be used as required.


How to Build and Package the Module.
Refer the following link for this. https://wiki.appcelerator.org/display/guides/iOS+Module+Development+Guide

How to create the objects of deferent classes: Steps:

1: require the Module
example:

var template = require('com.gl.template'); Note: "com.gl.template" will be your module id.

Method Calling Example:
template.METHODofModuleClass();

2:create the object of proxy class before calling there methods. 

example:
var sampleProxyObject = template.createSample(); or
var sampleProxyObject = template.createSample({});

Note: "createSample()" here "Sample" is the name used while creating proxy class, i.e. ComGlTemplateSampleProxy.

Method Calling Example:
sampleProxyObject.METHODofSampleProxyClass();

How to Add Proxy class Object to Another View Object.
Not Possible to add and it does not have any impact actually when we think logically.

3:create the object of viewProxy class before calling there methods.

example:
var sampleProxyViewObject = template.createSampleView(); or
var sampleProxyViewObject = template.createSampleView({});

Note: "createSampleView()" here "SampleView" is the name used while creating viewProxy class and view class, 
i.e. ComGlTemplateSampleViewProxy and view as ComGlTemplateSampleView.

Method Calling Example:
sampleProxyViewObject.METHODofSampleViewProxyClass();
How to Add ViewProxy class Object to Another View Object.

taking consideration that "windowObject" is already created and trying to add viewProxy Object in that.

example: windowObject.add(sampleProxyViewObject); Some Important Points to remember.

Note: Always call the view methods from the methods exposed in the viewProxy on MainThread else it will crash the application.
Note: ViewProxy object can be added to the Other View In titanium App But A normal proxy Objet can not.
Note: A Method with prefix "set" will receive the parameter directly while methods without "set" prefix will receive parameter as an NSArray Objet, single or multiple parameter does not have any impact on this behavior.